
Why easy to use cPanel ?
cPanel is a Linux based web GUI hosting control panel.
The main advantage of cPanel servers is that you can easily install and configure the Website and E-mail.
WHM - Web Host Manager is a tool that is also used, as well as the reseller server administrator.
Resellers can be accessed by authorized resellers in WHM, by using a reseller account can create and manage sub-accounts which may be limited modifications.
To change all the server level, server administrators need the Administrator login that you use to manage tasks such as Apache, Php and upgrading perl module installed. cPanel servers have access to the root password of the server. In the following blog, we look at the installation of cPanel Server on EC2.
Setup AWS EC2 for cPanel.
1. Start with log into the AWS Management Console. Open the Amazon EC2 console by choosing EC2 under Compute.
2. Launch an Amazon EC2 instance.
In the Amazon EC2 Dashboard, choose "Launch Instance" to create and configure your virtual machine.

3. Choose an Amazon Machine Image (AMI):
cPanel support below listed os so select AMI from this list

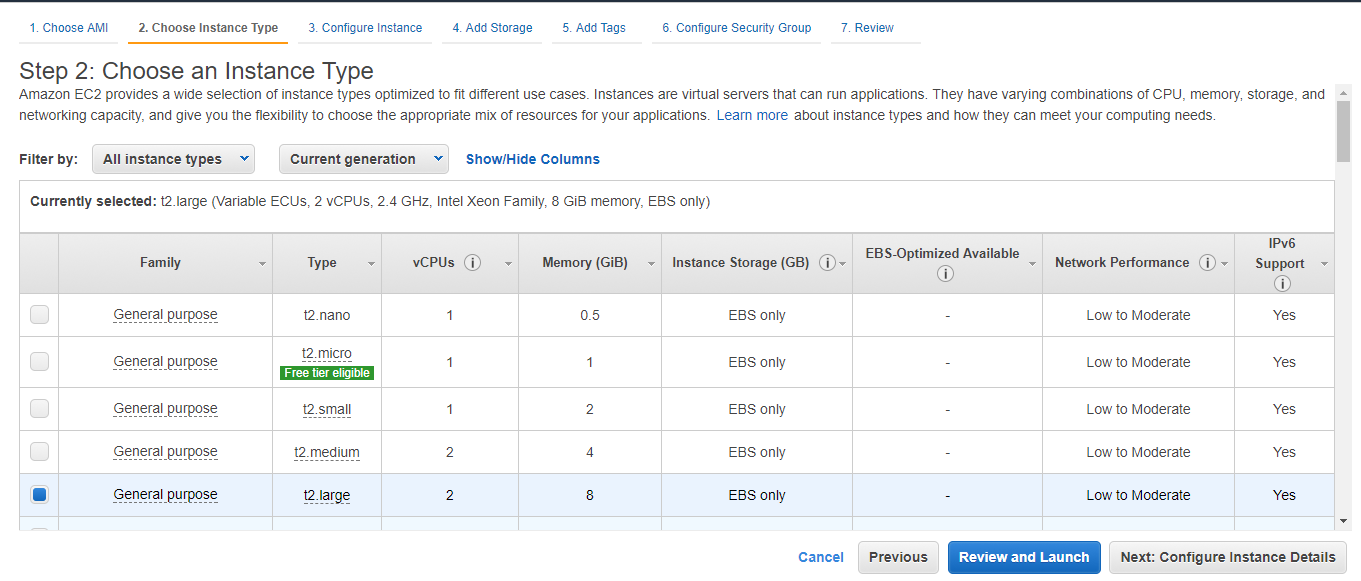
4. Choose the instance type. cPanel requires at-least 2GB of RAM to function so, its better to choose t2.small or higher.

5. Change the default storage of 8GB to 60 GB, cPanel requires at-least 40GB of space. We are setting it to 60GB to accommodate website files as well as backup.

6. Allow the following inbound ports in AWS security group
settings (FTP)20-21, (SSH)22, (HTTP)80, (HTTPS)443,
(cPanel)2082-2083, (WHM)2086-2087, (webmail)2095-2096.

7. Now choose either existing key pair or create new key pair. In case of creating new key pair don’t forget to download the keypair and keep it in a safe place. It is required to login to the instance.

8. Now you can launch your instance and once the instance is launched successfully attach the Elastic IP to the newly created instance. Elastic IP is required to have static IP to the instance.
9. Now you can login into server using public IP and install cPanel control panel. To install cPanel in AWS EC2 instance you have to download and run the installation script provided by cPanel.
cd /home
wget –N http://httpupdate.cpanel.net/latest
10. cPanel installation will take time to complete once the downloading is completed run the screen command to run the process in the background then run the sh command
chmod +x latest
sh latest
11. Access cPanel & WHM
Congratulation’s your WHM & cPanel setup has been completed successfully. You can access WHM and cPanel using following urls.
WHM : http://<yourserverIP>:2086
WHM with SSL : https://<yourserverIP>:2087
cPanel : http://<yourserverIP>:2082
cPanel with SSL : https://<yourserverIP>:2083
Thanks for being here : Need help for CPANEL INSTALLATION ON AWS EC2
To change all the server level, server administrators need the Administrator login that you use to manage tasks such as Apache, Php and upgrading perl module installed. cPanel servers have access to the root password of the server. In the following blog, we look at the installation of cPanel Server on EC2.
Setup AWS EC2 for cPanel.
1. Start with log into the AWS Management Console. Open the Amazon EC2 console by choosing EC2 under Compute.
2. Launch an Amazon EC2 instance.
In the Amazon EC2 Dashboard, choose "Launch Instance" to create and configure your virtual machine.

3. Choose an Amazon Machine Image (AMI):
cPanel support below listed os so select AMI from this list
- CentOS
- RedHat linux
- Amazon Linux version 1.x

Note : Amazon Linux 2 is not yet supported.
4. Choose the instance type. cPanel requires at-least 2GB of RAM to function so, its better to choose t2.small or higher.
5. Change the default storage of 8GB to 60 GB, cPanel requires at-least 40GB of space. We are setting it to 60GB to accommodate website files as well as backup.

6. Allow the following inbound ports in AWS security group
settings (FTP)20-21, (SSH)22, (HTTP)80, (HTTPS)443,
(cPanel)2082-2083, (WHM)2086-2087, (webmail)2095-2096.

7. Now choose either existing key pair or create new key pair. In case of creating new key pair don’t forget to download the keypair and keep it in a safe place. It is required to login to the instance.

8. Now you can launch your instance and once the instance is launched successfully attach the Elastic IP to the newly created instance. Elastic IP is required to have static IP to the instance.
9. Now you can login into server using public IP and install cPanel control panel. To install cPanel in AWS EC2 instance you have to download and run the installation script provided by cPanel.
cd /home
wget –N http://httpupdate.cpanel.net/latest
10. cPanel installation will take time to complete once the downloading is completed run the screen command to run the process in the background then run the sh command
chmod +x latest
sh latest
11. Access cPanel & WHM
Congratulation’s your WHM & cPanel setup has been completed successfully. You can access WHM and cPanel using following urls.
WHM : http://<yourserverIP>:2086
WHM with SSL : https://<yourserverIP>:2087
cPanel : http://<yourserverIP>:2082
cPanel with SSL : https://<yourserverIP>:2083
Thanks for being here : Need help for CPANEL INSTALLATION ON AWS EC2
This comment has been removed by a blog administrator.
ReplyDeleteThis comment has been removed by a blog administrator.
ReplyDeleteThis comment has been removed by a blog administrator.
ReplyDeleteIt was wondering if I could use this write-up on my other website, I will link it back to your website though.Great Thanks. A/B Testing
ReplyDeleteit may not appear to be significant when you are looking yet an organization that offers great telephone administration can be an incredible assistance particularly. https://onohosting.com/
ReplyDeleteFor changing your current web host, you have first to decide the best web host that meets your needs and requirements and sign up without leaving your old or current web host and without telling them that you intend to leave in order to avoid losing your website and data. There are some of the best web hosting providers that offer to transfer your website and domain name from your old web host to the new one. https://hostinglelo.in/
ReplyDeleteyour content is very inspiring and appriciating I really like it please visit my site for Satta King Result also check Satta king 24X7 and also check sattaking and for quick result check my site Satta matka and for super fast result check Satta king
ReplyDelete